Posts tagged Accessories
Fabric ink, napkin rings and buttonholes

—gina

1.24.12 010
A few weeks ago I had a crafting weekend at the coast with a pair of great friends.  I was determined to get through some things that have been on my list for waaaaaaay too long.  I also was determined to get comfortable with my buttonholer on my sewing machine.  I was successful on both fronts!  Over the weekend I completed 16 buttonholes, and they look good. 

One of the projects I brought (and finished) was a set of easy napkin rings for us to use every day.  We use cloth napkins and sometimes it's hard to remember who had which napkin the night before.  Other times it's challenging to convince my three year old that my napkin is not his.  So, I got this idea to make personalized rings.  I whipped them up quickly and there are a few things I would do differently.  I used a Moda Cross Weave fabric for my ring (shown above) and the weight was perfect.  I used Westminster Shot Cottons for the others and they were a bit too light weight (shown below).

1.24.12 012

The length is also something I changed up.  I made the boys' rings longer so I could easily stamp their names on them.  I'm not sure it's the best length.  I think the shorter length of mine works nicely to easily cinch up the ring.  My ring's finished length is 10.5”, the boys' is 15.5”.  I also got a little creative with some fabric ink and rubber stamps.  I headed over to Collage with my son and we chose a set of letters, a blue ink pad and a fancy dragon stamp.  (I also discovered that the more detailed the stamp, the more challenging it is to get a really good image on fabric, at least for the novice I am!)

Read More
More gift ideas and holiday schedule

--gina  

Books 008

Books are great, aren't they?  A good sewing book is both eye candy and a wonderful transporter of information all in one.  We have a great selection of books that fit that bill.  I currently don't have a space where I keep my sewing supplies out, ready for use, so sometimes sewing just doesn't happen because I don't want to take the time to unpack and repack everything before and after.  I can happily and easily pass an hour or two browsing through a sewing book, getting ideas, letting my imagination wander, mentally preparing for when I do have the time to unpack, repack and sew in between.

Books 005

Our book selection includes a group of Portland-authored gems we're so proud to offer. In addition to thoughtful, instructional, project-based books, we carry some gorgeous ones that are heavier on the images and lighter on the instruction.  These are the books I can get lost in, slowly turning pages, taking in all the fine details and incredible designs. 

Banner sample 001
Thanks to lovely customer Michelle for letting us snap a shot of one of her holiday creations!  Looking to make a banner of your own and want a little assistance?  Pick up Autumn's banner pattern next time you're in.  What a special gift for any one, for any occassion.

Please make note of our holiday closure times.  We will close at 3 pm on Thursday, December 22nd and reopen Tuesday, December 27th at 10 am.  We will also be closed Sunday, January 1st.  We'll put up a few more reminders as we get closer.

Read More
Hello November

--gina

I love November.  Cooking is one of my most favorite hobbies.  I can be happy reading cookbooks or food magazines all day long.  And, well, November's holiday involves so many recipes, it's heavenly for me to think about it all month leading up to the big day.  To honor this great month, or "eating month," we've decorated with aprons.  Our window and walls are covered.  All different styles for you to ponder.  This is only a small sampling of the selelction of apron patters we have on hand.  (And, many are marked down right now!) 

 Whats new 11.9.11 006

Another reason to love November is the great event our upstairs nieghbors, Bishops Barbershop, put on.  What more reason do you need to stop in?! Do good via a haircut and pick up a quick and easy project, perfect for a gift...

Screen shot 2011-10-31 at 2.47.59 PM

PS--Every year we contemplate being open on the Friday after Thanksgiving and every year we all decide we'd rather have that as a "bonus" day for us to spend with our friends, family, getting a little alone time, whatever we choose.  We'll be back in action on Saturday.  If you are out shopping, please support local businesses.  You'll feel good and love your purchases that much more!

Read More
Multi-Tasker Tote

--Meredith

I love a great tote bag. One that can really schlep around the mess of stuff I'm constantly carrying instead of resorting to a million smaller bags. Anna Maria Horner's pattern, Multi-Tasker Tote, lives up to its name. Check out the 4 pockets on the outside with just the right amount of room--one for my phone, my keys, my water bottle, and my coffee cup.

Pattern-Multi-Tasker Tote

I taught this bag a couple of times down at MD. The construction on this is really unique and it's best not to overthink it. Just follow the instructions--the bag doesn't really look like a bag until you're almost done. 

Finished Multi-Tasker Tote

Because of it's size, I would HIGHLY recommend heavier fabrics like canvas or denim. Be sure to pick up some bigger needles, at least a size 90/14 or even 100/16. At times you are working through several layers.

top view-Multi-Tasker Tote

If using a lighter fabric (or a coated cotton), plan to interface the entire body of the bag. This will help with structure. And don't forget the Peltex, an extra-firm interfacing, which provides a nice sturdy bottom. I didn't cover it with fabric, I simply inserted it between the lining and exterior for a clean finish. 

Interesting side note on my fabric choice, the viewfinder or View-Master was created and first produced here in Portland!

**Don't forget the amazing sale that starts TODAY! Pick up this and other patterns for 25% off, plus discounts on absolutely everything in the store. Stop by, say hello, and pick up some sweet deals.

Read More
Prepping for Halloween

--Meredith

little mummy in the window

Halloween is just around the corner and we all know what that means...costumes! There are loads of great ideas and free patterns in countless blogs to help inspire you.

Tulle can create such an ethereal effect. This notoriously shifty fabric can be used for a simple and fun tutu, great for enhancing costumes like storybook characters or favorite animals and bugs. Or use some of our felt and shiny ribbon with tulle or netting and transform your little one into the cutest pumpkin!

Tulle

Boning comes in handy for a number of costume ideas--think crazy vampire collars or Rocky Horror-style bodice shaping. Even this bat costume uses some with felt to create the wing shape!

boning

Check out the various weights of interfacing including one of the heaviest, Timtex. The structure would help shape a hat, collar, bodice, or other design detail that stuck away from the body. And it's fusible!

timtex, heavy interfacing

Need a little shine for wings, dresses, and capes? In addition to these more subtle colors, we also have rayon lining fabric in a variety of shades. 

shiny

One of my favs--glitter rick-rack! Embellish any character with this flashy trim that's perfect for Halloween night. You can also add it to the tulle tutu for extra sparkle.

glitter rick rack

A superhero cape (courtesy of Ellen Luckett Baker, author of 1,2,3 Sew) would be fun for a night of trick or treating and for playing year 'round. Along with the fabric, don't forget the velcro. This easy closure is sold by the yard so you can get exactly how much you need.

velcro by the yard

Felt is a Halloween staple; it's easy to use, doesn't fray, and we have it by the yard. Pirates, monkeys, and bees--oh my!

felt by the yard

And don't forget a Trick or Treat bag! I have a tutorial over on the MD blog that would be easy to customize with applique, fabric markers, or just two awesome fabrics!

Read More
Ribbon belts

--Meredith


Floral belt--side view

With a simple fun-colored buckle and beautiful ribbon you can craft this belt!

Lucite Buckles

Measure an existing belt to get the right length and be sure to add for overlap at the buckle and end. I layered them wrong sides together and simply topstitched them together, pivoting at corners and including the ends that have been turned under. You could use fusible web to join the two lengths before stitching as a precaution, if you'd like. 

finishing ends

Once you have joined the two layers, slip one end through the buckle and back onto itself and stitch. You'll have to extend past the buckle enough to actually sew it on your machine.

attaching to buckle

We've got so many great ribbons in stock! You could layer them as well, using a solid grosgrain and a pretty embroidered ribbon. The buckles come in different colors too so have fun playing.

Fun with ribbon and buckles

We've also got a variety of buckles in stock. Pick your style!

Metal BucklesPlastic Buckles

Consider fabric that's been interfaced, ribbon, & faux leather.

O-ring Buckles

Read More
Weekend Project: Knit scarf

--Meredith


Cozy!

I had a bit of knit leftover from my legwarmers, so I decided to whip up one of those long-chunky-mobius-wrap-a-million-times scarves. The finished ring is approx 12" wide and 100" around. I pieced two 12" pieces that were cut from the scrap, and simply serged them together. I didn't ACTUALLY make it mobius since it wouldn't affect the finished scarf but hey, that could be fun too. Remember, because of the nature of knit, the raw edges don't fray. So this really was a 10 minute project!

One loooooong scarf.

One loooooong scarf

That can be twisted once.

Twice

And even twisted again.

Three times

Read More
Back to School Backpack

--Meredith

On a recent visit with my dear friend, Mollie, we got to catch up on a lot of news. This family has been a part of my life for a while, having known them in NYC. I had not realized how soon it was until her daughter, Maggie, was starting Kindergarten. Like this week! Being one without kids keeps me oblivious to these things. We chatted about buying school supplies, a favorite activity of mine growing up, and that Maggie would need a backpack. Lightbulb! "Maggie, would you like me to make you a backpack?"

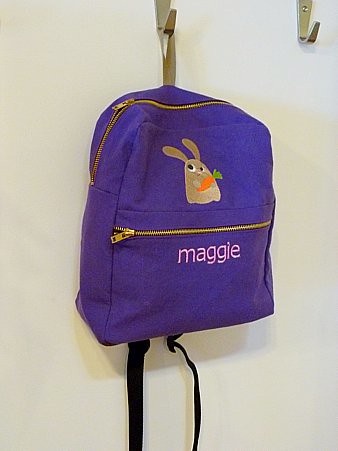
Needless to say, I got fairly explicit instructions that I was happy to oblige. It's something I know as a sewist I take for granted--getting to produce and wear or carry exactly what I would like. Now I'm on a mission to produce a purple backpack with a baby brown bunny holding a carrot and with Maggie's name in pink.

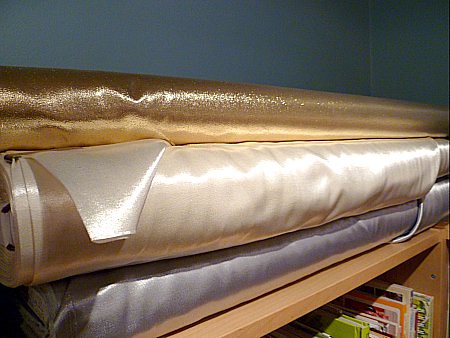
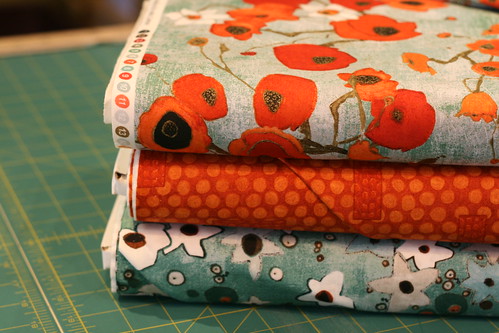
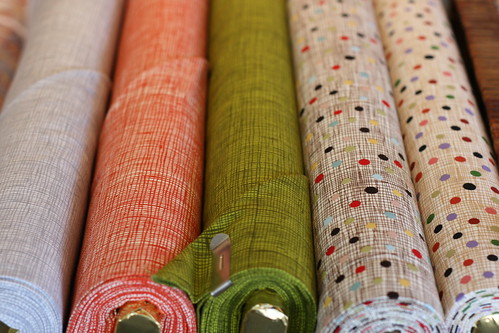
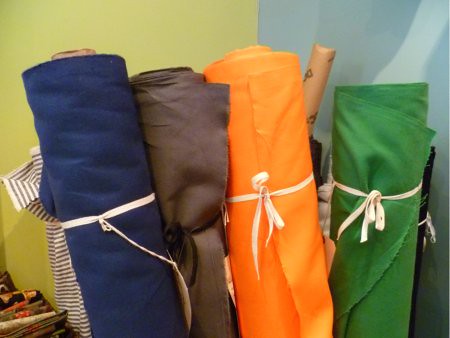
I had purple canvas in my stash but we've got neutrals and fun colors in stock. I do recommend something with a little more heft to it, like canvas or home dec.

Canvas Selection

These cars or trains would have been awesome. Maybe for her brother. But I'm under strict orders!

Echino options

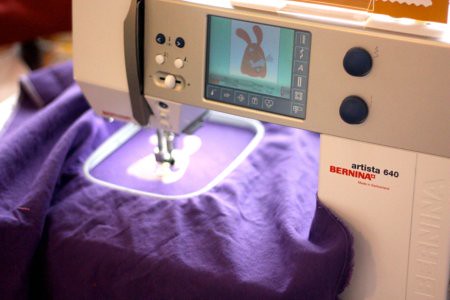
First up, embroider or applique the bunny? Since time was a factor and I'm no Anna Joyce, I found a sweet little bunny over on Urban Threads. Embroider, check!

Embroidering bunny

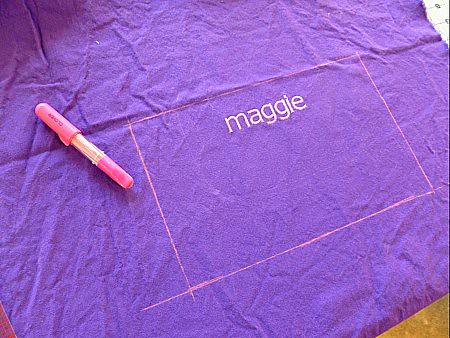
Name in pink, check!

placement of embroidery on backpack pocket

Pattern time. I'd heard through the grapevine that Melissa's Not-So-Big Backpack (from the Fall 2010 Stitch Magazine) shape and size was good for all of Maggie's Kindergarten needs. But I definitely wanted it lined. I simply cut the front, back, and side & bottom panel pieces out of a lining as well. I also interfaced the panel pieces of the exterior.

Stitch, Fall 2010

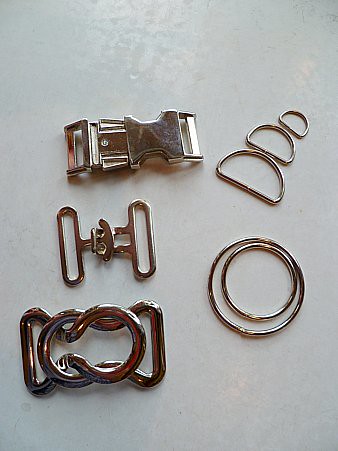
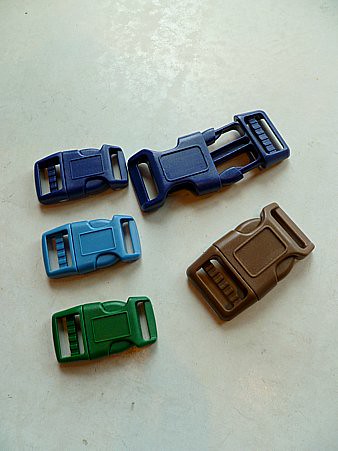
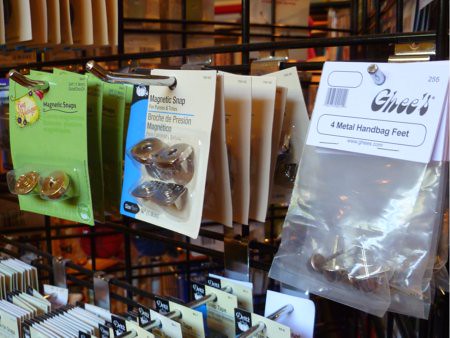
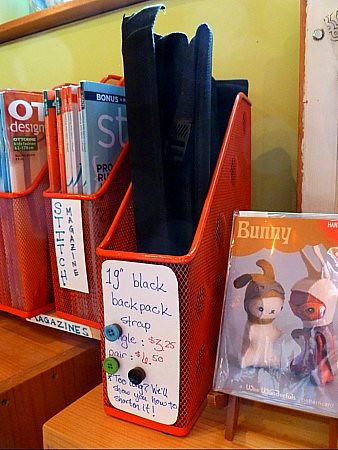
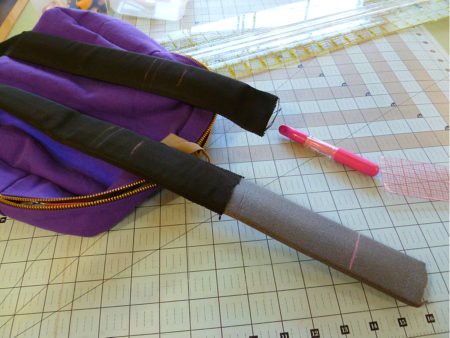
Hardware. I think metal teeth zippers look awesome so I picked some of those up along with these backpack straps we are now carrying.

backpack straps available-quick and easy!

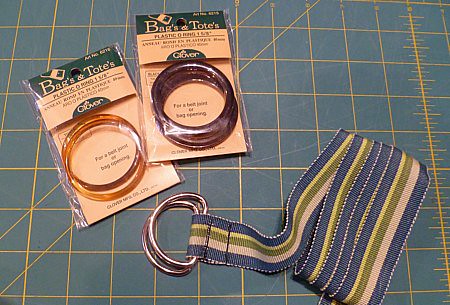
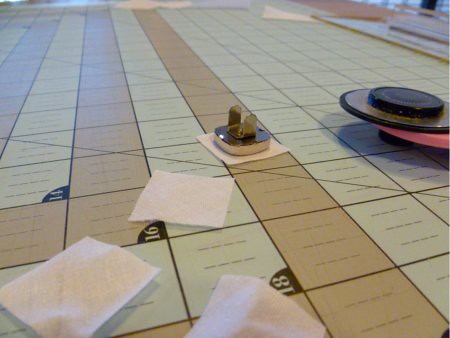
Easy enough to change length--simply shift the foam insert up and trim away the excess. Then slip it back down and trim the cover. There should be some cover that extends past the foam. I left approx 1/2". Nylon webbing for lower strap, check!

Altering backpack strap

The construction felt fairly straight forward. It was very similar to other bags I've made, namely Amy Butler's Weekender Bag (but without all the headache that one caused). The majority of the work was done in under 2 hours, plus strap fitting and hand finishing and machine embroidery.

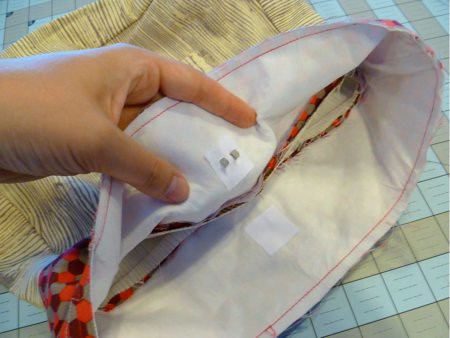
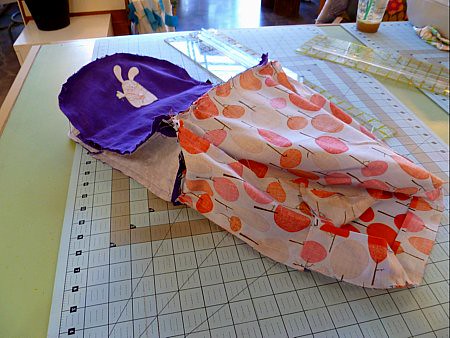
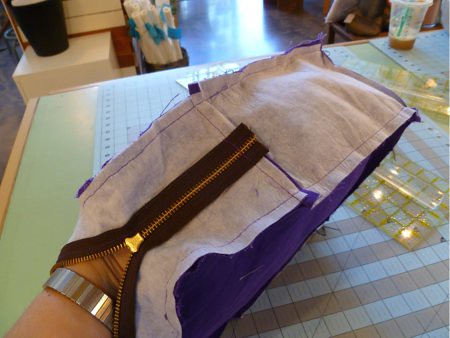
I took a cue from Oliver & S's Little Things to Sew book for sewing in the lining. Here you can see the exterior and lining have been pinned together at the bottom seam. 

pinning lining to exterior along stitch lines

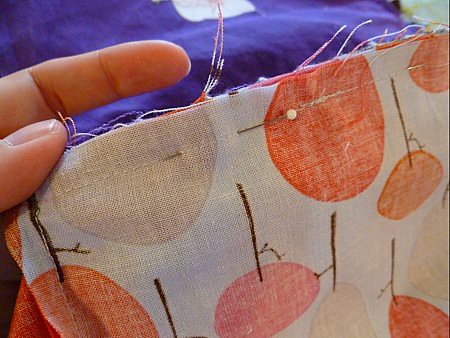
A trick I learned for being uber-accurate when lining up two seam lines (and I think works well for darts too) is to pin on top of the stitch line through both layers. That way you ensure no slippage and the seams match up.

pinning for accurate stitching

sewing lining to exterior

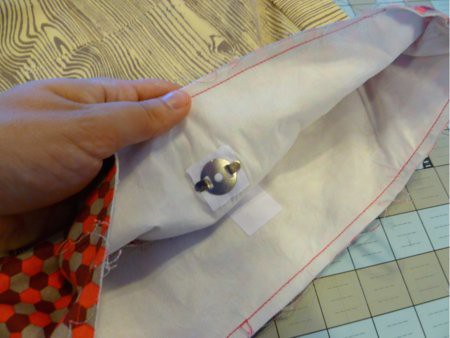
Once the bag is right side out with the lining inside, you simply hand stitch the zipper opening in the lining to the zipper tape. 

pinning lining around zipper

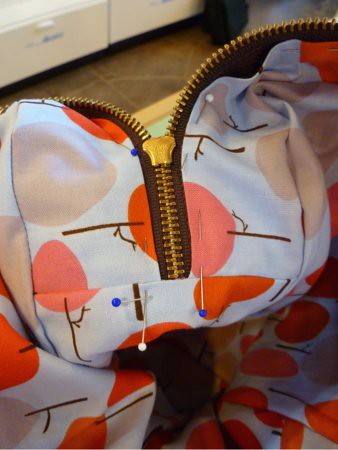
When using a metal or molded zipper, I always walk the machine's hand wheel over the needle. That way I can prevent needle breakage and reinforce the area with backstitching. This is definitely a stress point. No needles were harmed in the making of this backpack!

walk handwheel over metal teeth zippers

For the bottom panel, I subbed in a faux leather. I thought this would make it more durable. And attractive!

faux leather bottom

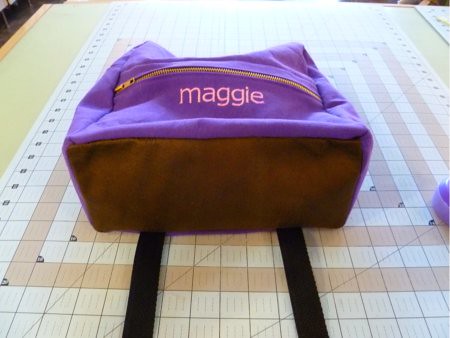
All set and ready for the first day of school, check!

Hanging-finished Front

Maybe you've already got a backpack ready to go but still want to send them to school with something handmade? Erica's offering an Insulated Lunch Bag class that's perfect for back to school. Take it a step further and join me in Embroidery DIY to personalize your project. I'm offering a free spot in the class, just leave a comment over on the MD blog!


Read More
Details in bag making

--Meredith

I personally think it's the small details like hardware that make your handmade bags professional looking. You can easily incorporate items like magnetic snap closures or purse feet, even when the pattern doesn't specifically request them. A lot of times these don't even require additional tools to install.

Case in point--a bag I started while I was still living in NYC. It's the Folklore Bag from the book One Yard Wonders. I unearthed it in a bin last week while I was finishing up Fall class samples for MD and thought to myself "While I may not be in love with this bag anymore, it won't do anybody any good sitting here in pieces. I should finish it!" Aren't you proud of me?

The next step was for me to stop by Bolt and pick up magnetic snap closures.

Handbag hardware

Even though I had used interfacing (some non-woven, non-fusible I had laying around and wanted to use up because it's not my fav), I reinforced the area with Stacey Shape-flex fusible interfacing (my actual fav) that I had cut into squares just large enough to surround the hardware, about an inch. I did double it for extra stability.

interfacing cut to fit closure area

The package suggests a small piece of cardboard but that seems like overkill to me. After marking the location, I pierced two holes with an awl and pushed the prongs through to the inside.

prongs inserted through pierced holes

Then placed the support over the prongs and bent them to either side.

magentic snap installed

All of this, of course, wants to happen before joining the exterior and lining together. Now I could zip around the top edge and turn my bag right side out through a hole I had left in the lining. A quick press and an topstitch around with my trusty #10 Edgestitch foot and my bag is finished.

Folklore Bag from One Yard Wonders Small details with big impressions

I think it's cute but a little small for my taste. I'm a big bag kind of lady. If I were to do another bag (or more appropriately WHEN I do another bag), I might stitch up one of these. Similar in shape and I like when the pattern calls for finding fabric combos.

Betz White, Isabella ToteAmy Butler, Birdie Sling Pink Chalk Studios, Mail Sack

Naturally, I couldn't help but pick out some fabric while I was there. Home-dec is great for bags because of its heavier weight. And I've totally been eyeing this amazingly bizarre bunny-in-flowers Kokka fabric we got in. I LOVE it, especially with the scroll-work Alexander Henry.

Second Bag, option 1. Kokka & Alexander Henry

Or this highly graphic Anna Maria Horner with the Echino dot?

Second bag, option 2. Anna Maria Horner & Echino.

As you can see, I'm obviously in a major plum and mustard phase right now because my second option is a little too similar to my first. I'm nothing if not consistent. 


Read More
What's New

--Gina

9.9.11 018 

I know some of you have been waiting to hear this: Birch Fabrics' "Storyboek" is here!  This is such a darling line, including these two fantastic cheater prints.  The colors are fresh, images sweet and classic, perfect for creating a darling nursery.  The added bonus--it's all organic fabric with low-impact dyes! 

We also have some super nifty backpack straps.  They are 19" long, padded, and shortenable.  April has made a fantastic backpack with pre-made straps like these and I've eyed it for a long time.  I think it's time I make one for myself.  Don't get me wrong, I love a tote bag, both making and using, as much as the next sewist, but I grew up with my Dad suggesting what my shoulders would end up like if I didn't wear straps on both shoulders.  Of course, his demonstration was extremely exaggerated, but his point was taken.  The straps are sold individually, just in case you only need one.

9.9.11 017 
Don't forget this Saturday is the Alberta Street Fair!  Good times to be had, for sure.


Read More
1, 2, 3 Sew

Cover

Totes

--Melissa

We get a lot of questions about the sorts of books and patterns one should buy for a new sewist. We are so happy to be able to add Ellen Luckett Baker's 1,2,3 Sew: Build Your Skills With 33 Simple Projects to the growing list of primers for those of us finding our feet at the sewing machine, and those of us needing a little bit of fresh inspiration.

Ellen has divided her projects into chapters that each contain 3 skill building projects. The diagrams and instructions are clear and thorough and the photography has been beautifully shot and styled. It is straight forward enough for a beginner sewer at any age and is really the PERFECT book for giving along with a beginner sewing kit or sewing machine. For those of you who have your kids in one of Shelly's summer camps down at MD and want to keep your kid busy for the rest of the summer at home, get this book and a couple of yards of fabric, and you are all set.

Tiered Bag

I wanted to give the book a test run, so I chose the Tiered Bag pattern and a mid weight silk blend from the shop. The pattern calls for twill or canvas, and this would have been a far better choice for someone just gaining experience sewing bags. The silk is shifty and I managed to unravel the edges just by looking at it sideways. I had a feeling that I was in for a small challenge though, and was so pleased with both the pattern and the results. It only looks crooked in the picture. I promise. (The scribbles on the wall, however, are real.)

Tiered Bag

The pattern is well designed and contained a ton of great skill-building techniques that everyone needs to design and make their own bags: inserting lining, squaring off corners and sewing interior pockets. And with all of her patterns, Ellen offers suggestions and leaves room for modifications to make it uniquely yours. As with Jennifer Paganelli's Girl's World, I am impressed with the way that Chronicle is choosing to print up the pattern pieces. The individual projects are printed up separately on smaller sheets of quality pattern paper, so no tracing (unless you want to!) and everything fits back into its pocket.

Organizers

Would you like a copy? Chronicle has generously offered one up for one commenter (US addresses only please). Are you learning to sew? Do you need a little push in the skill-building department? Do you know someone who does? Are you a big fan of Ellen and all her work at The Long Thread? Let us know and we'll pull a name next week. Thanks Chronicle!

Read More
Susan G Komen Fundraiser and New Fabric

Karen Fiori

(Gallery Fiori by Karen Tusinski for P&B Textiles)

This Saturday, July 9th, we will be raising money for the Susan G Komen affiliate for Oregon and SW Washington. Here's how it will work: come out and shop to your hearts' content and we'll write a check to SGKF for 10% of the day's total sales. As a thank you, with your purchase you will receive a coupon for a future purchase. The value of the coupon will be based on your receipt's total.  For spending up to $25, you'll get 15% off, spend $25.01-$60 and you'll get 20% off and over $60, you'll get 25% off (remember, these discounts are for future purchases).

Alexander Henry

Alexander Henry Home Dec

Alexander Henry

There are going to be even more new bolts before now and then, but just to whet your appetite, we have lots of new prints from Alexander Henry, including the Urban Dots and some home dec weight!

Read More