Weekend Project: A Getting Started Project for Tiny People
(Reminder: we will be closed Monday and Tuesday of this week.)
We tackled a baby quilt, but there are lots of other (and easier!) ways to show a new parent how excited you are to welcome a little one. Bibs were an essential part of our family entourage during the first year of all my boy's lives. I used them for bottle feeding and spit-ups long before we moved to all that soft food. Every so often one still gets stacked in with the napkins and someone ends up using one to their hands at the breakfast table.They are great to make en masse and then keep on hand to have give as baby having season approaches!
The perfect bib (in my opinion) is: Cute (obviously), modern, soft, plastic and pocket-free, absorbent, and medium-sized. They are astonishingly hard to find in stores. I used the template from Amy Karol's Bend-the-Rules Sewing for this project, but there is a bib pattern piece in almost all the baby sewing books, including ones by Amy Butler and Lotta Jansdotter. You can sketch your own pattern piece or trace an existing bib you may own and like. Your pattern piece will fit from edge to edge on a regular 8 1/2" by 11" piece of paper. Sometimes I go a stitch longer, but paper-sized is a great guide to start with.

I started with three fat quarters from Jay McCaroll's Habitat line. It is PERFECT for a project like this as it qualifies under the "cute" and "modern" categories as well as in the lesser known "not too precious" column. Look! Paint Spatters! Bring on the spaghetti sauce, Sir. Three fat quarters will be enough for SIX whole bibs. My favourite bib backing is terry cloth or towelling. You can cut up a still absorbent but slightly holey towel, or you can splurge and go for the wonderfully soft, organic terry we have at the store right now. I did the latter and bought an entire yard (we'll have an upcoming project that will utilize any leftovers). I like velcro/hook and loop tape for closures, because I always have some laying around. Snaps are great as well, and so are simple button and button-hole closures.
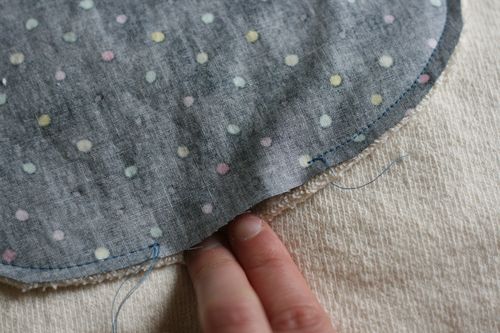
So! You're ready to go. Place your terry cloth and print fabric right (soft) sides together. Pin your pattern piece in place and carefully cut out around your pattern piece. Take the pattern piece off, replace your pins (the terry can get a little shifty) and transfer to the sewing machine. Beginning a 1/2" inch from the edge and near the bottom corner begin sewing around the perimeter of your bib, backtacking at each end. Leave a 2" gap between the beginning and the end of your stitch line so that you can turn it right-side out.


Clip the seam allowance at the neck curve, and grade (trim) your seam allowance slightly around the closure ends.

Turn bib right side out, using a pencil or chopstick to turn out all the curves. Press the bib completely flat, turning the edges of your fabric inward where you've left the bottom gap. Place a single pin keeping the fabric turned in and your gap even. Topstitch around the entire perimeter of your bib 1/4" away from the edge. Your gap is now closed! If you are nervous about topstitching an even, straight line, opt for a short zigzag stitch. It is very forgiving and cute-- when I look at all the bibs I made my first born, ALL my topstitching was some form of a zigzag.
Now you can adhere your snaps in place (you can buy snaps that come complete with their own min snap setter) or sew on your velcro.
That took almost no time, right? You are going to be one heckuva shower gift-giver.


