Getting Started: An Improv Straight Line Quilt in Three Parts

Starting a project for yourself or for someone you love can be a daunting proposition when you're learning how to sew. FINISHING that project can be even harder! We're going to go step by step through a series of projects to help you get and stay motivated. The projects will be geared towards basic skill building, but as projects, they are suitable for all skill levels!
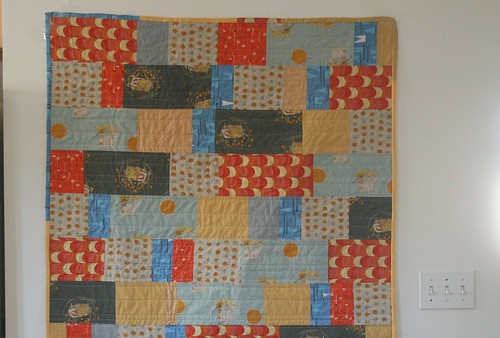
First up, we're going to tackle a simple quilt that would make a treasured baby gift of couch throw. The finished dimensions are going to be approximately 40" by 50" (large enough so that tiny baby will be able to actually enjoy it when they are a bit older). We're going to limit our palette and fabric options as to not get overwhelmed with choice. We're also going to highlight rules you don't want to break, so we don't sabotage our end result.
PART ONE

Choices, Choices.
Like I said, we're going to limit the palette. By sticking to a theme, you'll be able to move quickly and we'll end up with a more cohesive project*. You'll need:
- 1/3 yards of 3 Novelty prints. I chose a Far and Away linen/cotton blend. Normally, I would stick to 100% cotton, but this substrate from Kokka has a lovely hand and plays nicely with quilter's cotton. Large scale floral designs, etc., fall into this category as well.
- 1/3 yards of 3 Coordinating blenders. These can be stripes, dots, or other all over prints that complement your novelty prints. I chose two prints from Lizzy Dish and a orange floral print from my stash.
- Fat quarters or 1/3 yards of 2 or 3 complementary Solids or near Solids. Look for shades that will pick up and highlight the colors that you love in your novelty prints. Solids are an inexpensive way to flush out your stash and bring a color story together. I used a mix of yellow and grey. The extra fabric is for binding.
- Quilt Batting-- we carry Warm and Natural brand cotton batting by the yard or package. You'll want a piece several inches larger on all sides than your finished top.
- A piece of flannel or other quilt weight cotton large enough for your backing. For the quilt we're making, 2 yards will be plenty. If your quilt is wider than 40", you may need 3 yards. You may want to hold off on buying backing until your top is done.
- Spool of 100% cotton in off white (or other coordinating color. Grey or brown are good neutral matches for darker palettes).
(*Increase amounts to half yards if you're planning a larger quilt)
Prewash!
Sometimes I prewash, sometimes I don't. I ALWAYS prewash flannel and I always prewash linen/cotton blends. The shrink rates are going to be slightly different if you use different fabrics, and you won't want dramatically uneven shrinking when you throw your finished project into the wash.

Cut 'Em Up
When everything comes out of the dryer, it may be a tangled mess. Never fear. Cut away those extra threads and get your iron nice and hot. Press everything well, using a spray bottle of water for those tough areas. To square your fabric up, hold the selvages together (the edges with the print on them) and arrange the fabric until it lies flat. Use a ruler and rotary cutter and cut the raw edge exactly perpendicular to the fold.
In order to maximize fabric usage, all of the rows for this quilt are going to be 5 1/4" wide. With your fabric folded in half (selvage to selvage) and squared, use the folded edge as your straight edge to make a perpendicular cut for 5 1/4" strips. Unfold your fabric.
Novelty Print: Cut similar sized pieces to maximize their punch-- in this case, they'll each be about 10 1/2" long. I cut two of my novelties this size, and the third one, I cut again in half to make pieces approximately 5 1/4" square.
Solids and Complementary Fabric: Cut a variety of sizes to start. I sliced my blue flags into pieces 3" wide and left my orange stripes long.

Lay It Out
This is where it starts to get good. Start laying out your pieces in rows by alternating prints and sizes. Don't think to much, just go for it. You'll be able to move things around once you have it mostly laid out. If you only have room for 3 or 4 rows, do those! The entire quilt is going to be 10 rows long, total. Measure the approximate length of your first row-- if the pieces are end to end, it should be 43-44" wide. Make sure all subsequent rows are at least that long or longer. You'll be able to trim everything down to size once you've sewn the rows together.

Stack to Sew
Once you've got your quilt laid out, step back as far away as you can and squint at it. You'll be able to get a better sense of color and print distribution. Look at it from all angles and make sure you're happy with it.
Stack your pieces by row, one piece on top of the other from left to right. Pin a piece of paper to the first piece of every row indicating which number row it is. Move your stacks to the sewing machine.
Start Piecing!
With right sides together, line up your pieces along the top and one side edge and begin to sew them together using the 1/4" seam allowance guide on your foot or sewing machine. Since we're not matching corners, the seam allowance length is not crucial to keep, as long as you keep your seam allowance consistent. If we were making a quilt where corner matching was key, a 1/4" piecing foot is helpful. We could also measure from the needle position out to 1/4" and run a piece of tape on your machine to mark the edge.
I'll see you back here soon for Part 2!
Books I Love:
Elizabeth Hartman's The Practical Guide to Patchwork: New Basics for the Modern Quiltmaker is an excellent source for quiltmaking basics. The patterns are super cute, to boot. Elizabeth teaches some fantastic classes down at Modern Domestic.
Quilts by Denyse Schmidt was published in 2005 and introduced modern improvisational quilt making to the masses. The book contains how-tos and basics for 30 patchwork projects.
The Modern Quilt Workshop by Bill Kerr and Weeks Ringle is another favorite. They go deep into color design and quilt making basics with stunning results.